Transformation Components #
Transformation Components are used to shape the Extracted data (e.g. remove some columns, change column names, filter data, etc.).
Each Transformation Node needs to be correctly configured in order to properly
Transform data. Double-clicking on the Node or clicking the
 icon will open the configuration window for any
Node.
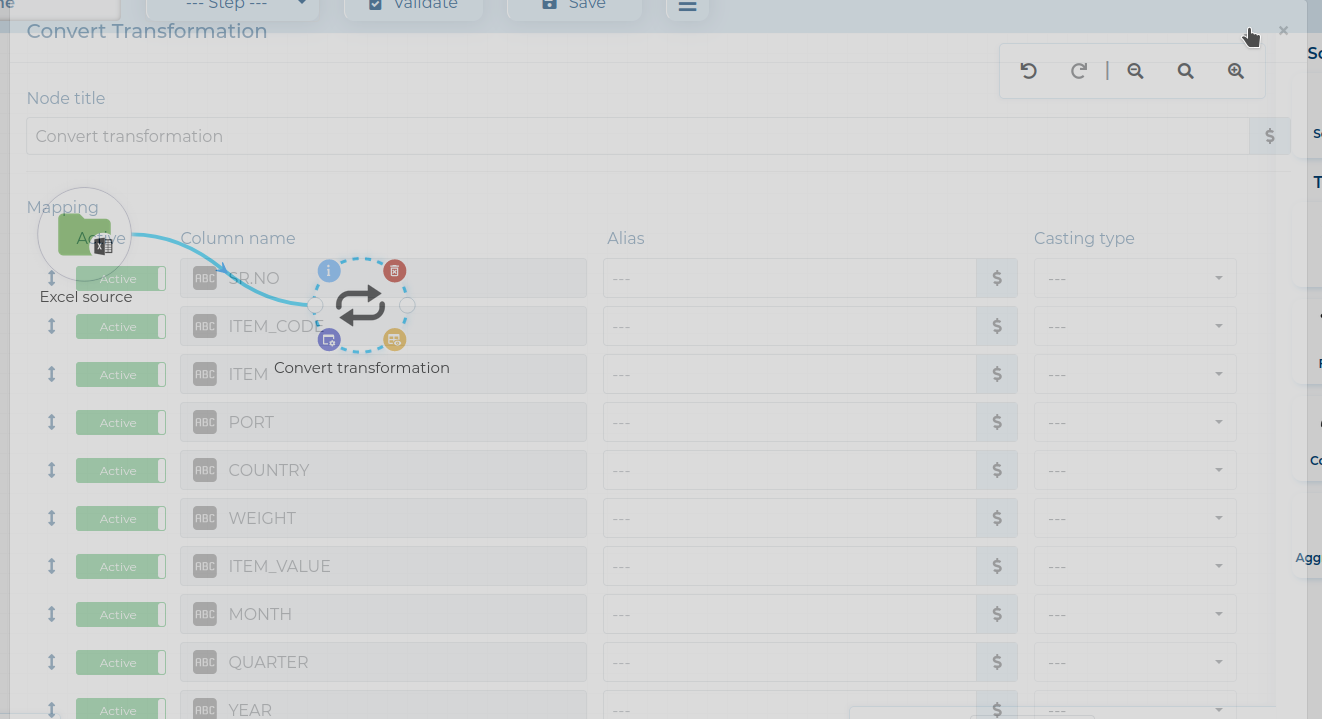
When you click the Minimalize button in the top right corner of the window (circled red), the window will become transparent, allowing you to see the Workspace.
Clicking the Save button will first validate the configuration. If any errors occur, an error message will appear under the field that was not configured correctly. If the configuration is valid, the window will close, and you can return to modifying your Workflow.
If you can modify any data in the configuration windows with Process Parameters, a smallicon will be displayed on the left of the field that can be configured by it.
Join #
This Transformation generates a combination of records based on a related column in two tables. You need to connect exactly two Nodes as input to the Join Transformation Node - one LEFT (L) and one RIGHT (R).
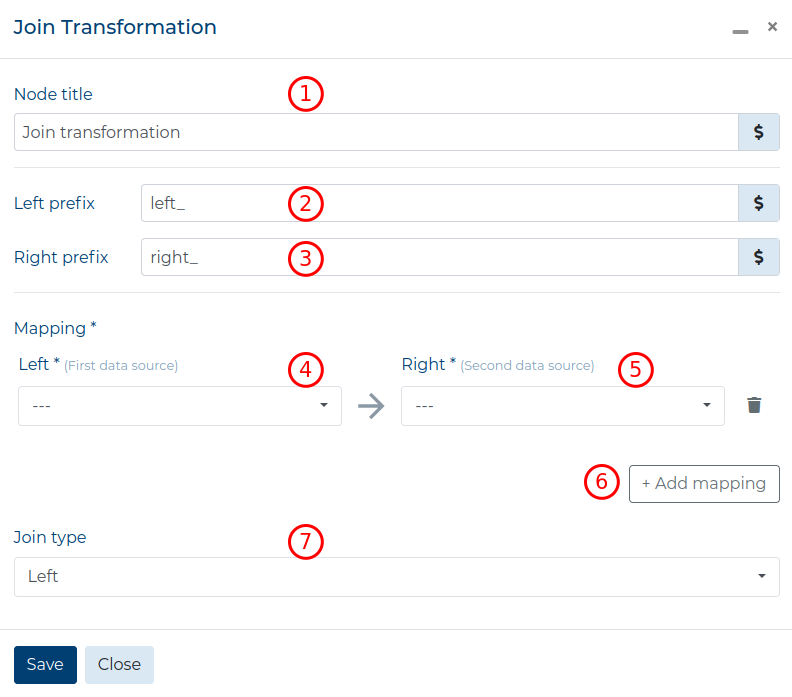
In the configuration window for the Join Transformation, you need to fill out the following fields:
- Node title - the title of this Node that will be displayed on the Workspace and in the Data Preview window (Optional),
- Left prefix - the prefix to be added to the columns from the left input after the join,
- Right prefix - the prefix to be added to the columns from the right input after the join,
- Left Mapping - which column from the first input to use in the join; select from all detected columns from the input Node that was connected as the LEFT (L) input,
- Right Mapping - which column from the second input to use in the join; select from all detected columns from the input Node that was connected as the RIGHT (R) input,
- Add mapping - button that adds another join column pair to match,
- Join type - select the Type of Join to use; choose
from
Left,Right,OuterandInner.
The types of the chosen columns in Left Mapping and Right Mapping must be the same.
Filter #
This Transformation generates a table with filtered data. You need to connect exactly one Node as input to the Filter Transformation Node.
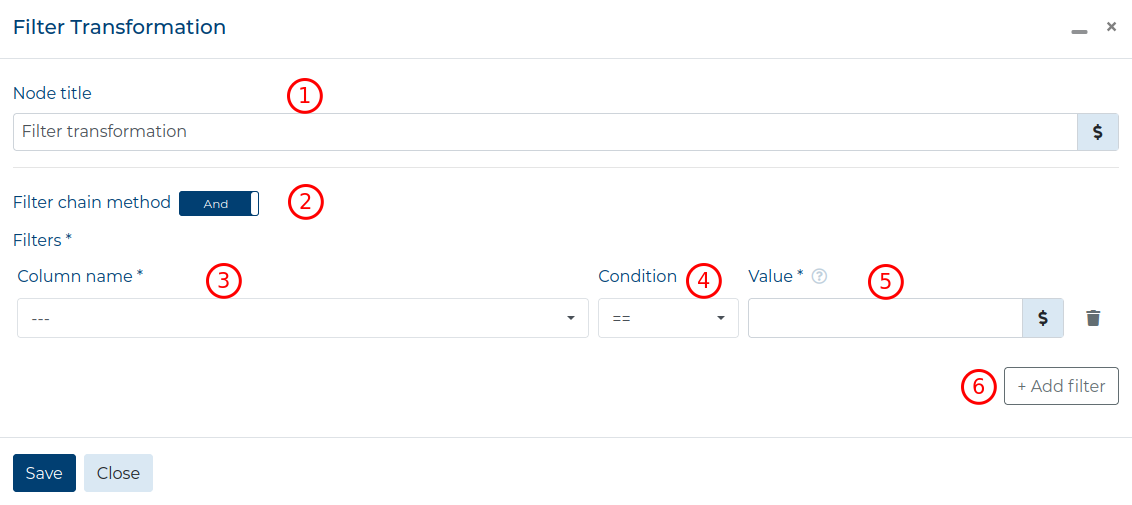
In the configuration window for the Filter Transformation, you need to fill out the following fields:
- Node title - the title of this Node that will be displayed on the Workspace and in the Data Preview window (Optional),
- Filter chain method - how to chain all provided filters:
- And to filter data that matches all filters,
- Or to filter data that matches any of the filters,
- Column name - choose the column from which to filter; select from all detected columns from the input Node,
- Condition - the logical condition to use for filtering; available options are:
- == (equals) - data matches the provided value,
- != (not equals) - data does not match the provided value,
- < (less than) - data is less than the provided value,
- <= (less than or equal) - data is less than or matches the provided value,
- > (greater than) - data is greater than the provided value,
- >= (greater than or equal) - data is greater than or matches the provided value,
- isnull (is null) - data does not have any value,
- notnull (not null) - data has any value and is not
None, - regexp (Regular Expression) - a regular expression pattern to use for filtering; only available for String type columns,
- Value - the value to filter; disabled for isnull and notnull,
- Add filter - button to add another filter.
Convert #
This Transformation modifies the column structure of the inputted Node. You need to connect exactly one Node as input to the Convert Transformation Node.
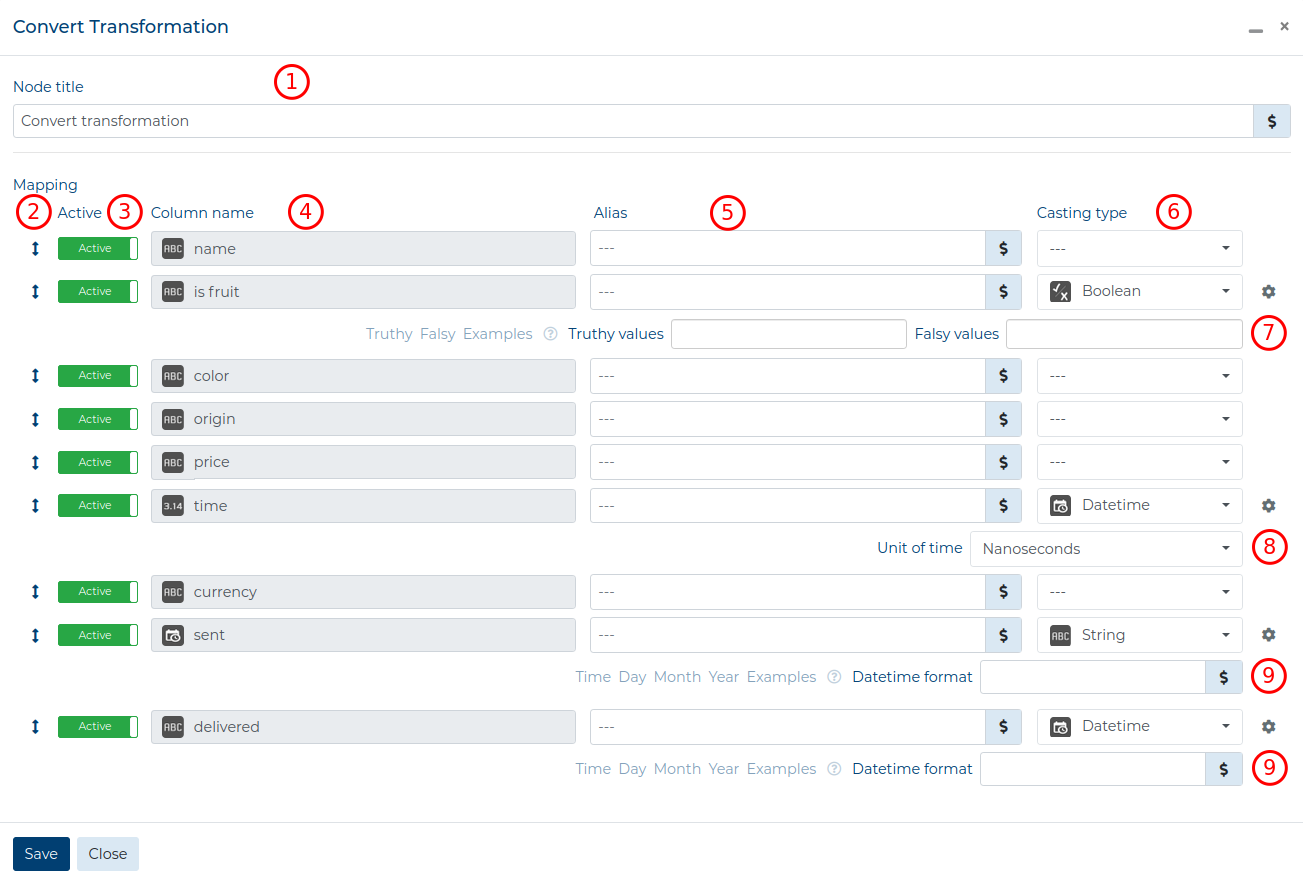
In the configuration window for the Convert Transformation, you need to fill out the following fields:
- Node title - the title of this Node that will be displayed on the Workspace and in the Data Preview window (Optional),
- the
 icon used to change the position of the column,
 - Active - whether to use this column as output; when toggled to
Inactive, the column will be deleted, - Alias - if filled out, the column will be renamed to the Alias; if left blank, will not change the column name;
- Casting type - change the data type of the column; available options are:
 Integer - data in the form of numbers without a decimal
point,
 Float - data in the form of numbers with a decimal
point,
 Boolean - either
 trueorfalse; you can further configure this convertion by clicking the icon and
providing
 Truthy(value that should be treated astrue) andFalsy(value that should be treated asfalse) values (7) (you can add more than one value to each field), Datetime - data in the form of date and time; when
you convert a Float or Integer column to Datetime, you can specify what time
unit the value represents by clicking the
  icon and filling
out the Unit of Time field (8); when the column value is a string in the form of a
Timestamp you can specify the Date format after
clicking the
  icon and filling out the Date format
field (9); hovering over the examples will show hints how to fill this field (e.g. using
%Y-%m-%das a Date format will convert the values to1944-08-01); String - plain text data; if you convert a Datetime
column to a String type you can specify the Date format after clicking
the
  icon and filling out the Date format field (9);
hovering over the examples will show hints how to fill this field (e.g. using
 %Y-%m-%das a Date format will convert the values to1944-08-01),
Union #
This Transformation generates a table that has data from 2 to 5 input Nodes. The Nodes need to have the same column structure and data types. This Transformation adds a column named DATA_SOURCE with information from which input Node the generated data comes from.
Remember that the order of the connected inputs represents the order the data will appear in the merged table.
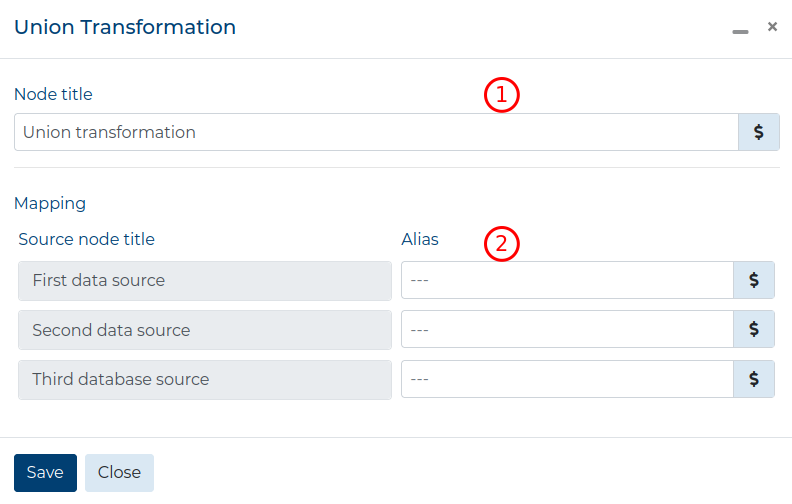
In the configuration window for the Convert Transformation, you need to fill out the following fields:
- Node title - the title of this Node that will be displayed on the Workspace and in the Data Preview window (Optional),
- Alias - the name to use as the value in the added DATA_SOURCE column; if not set, the Node title of the input Node is used.
Script #
This Transformation is for advanced users. It allows them to use a Python script to create custom modifications to the data tables, not available by other Transformations.
Script Transformation can use more than one Node as inputs (available in the INPUT_DATA
list variable) and must return a Python Pandas DataFrame.
This Transformation must work if an empty Python Pandas DataFrame is used as an input! Remember to prepare this Transformation correctly, otherwise the modifier might not work properly! Click here for more information and examples.
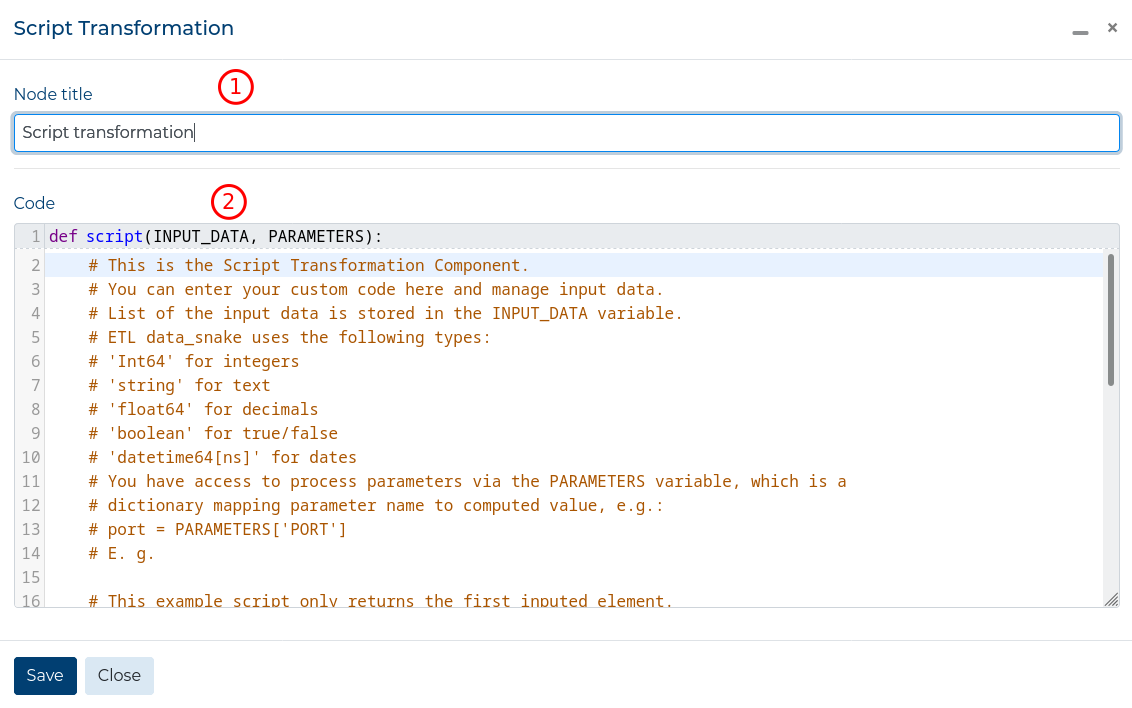
In the configuration window for the Script Transformation, you need to fill out the following fields:
- Node title - the title of this Node that will be displayed on the Workspace and in the Data Preview window (Optional),
- Code - the code to execute to Transform data;
View the list of available packages for reference.
Use this Transformation with caution! This is only for users who know what they are doing!
Add column #
This Transformation allows you to add columns to the data structure with a specific value. You choose the name, type and the place where new column will be positioned in the data structure.
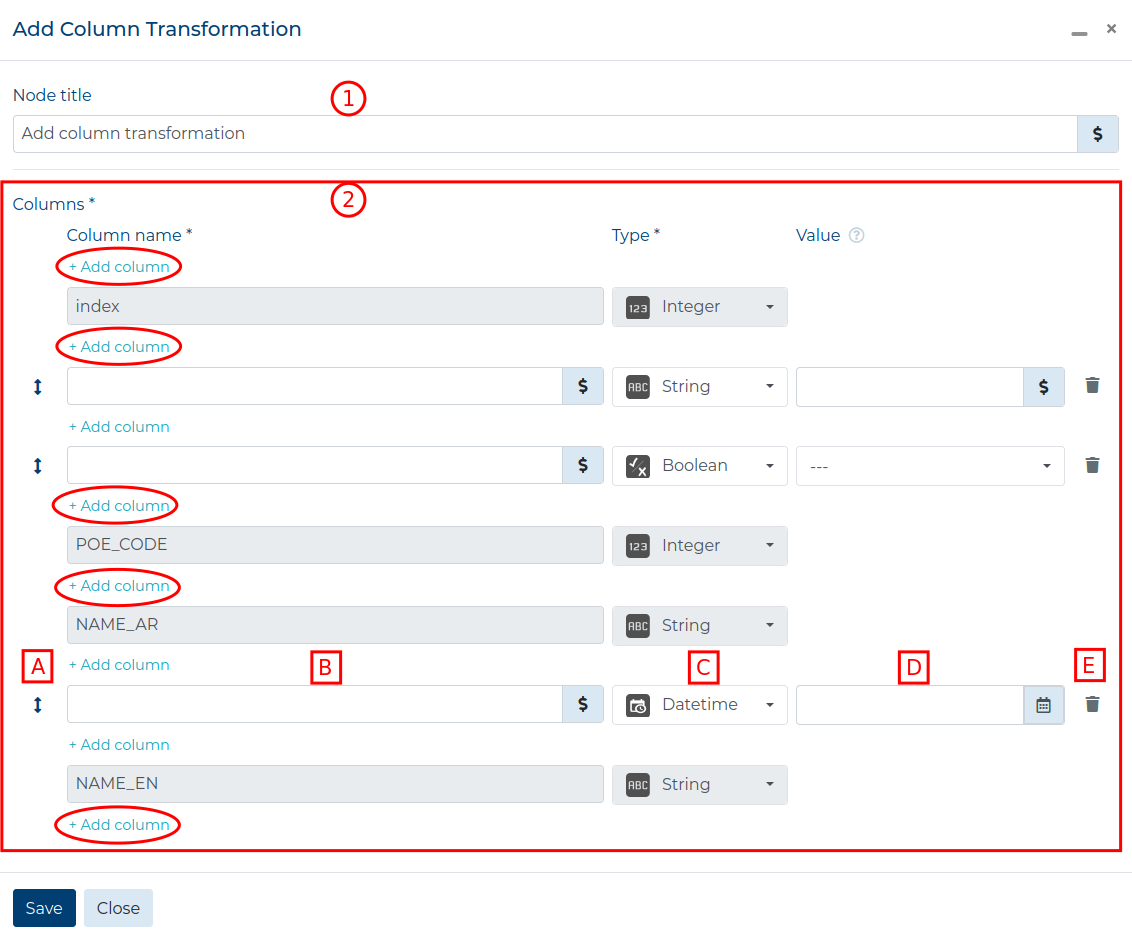
In the configuration window for the Add column Transformation, you need to fill out the following fields:
- Node title - the title of this Node that will be displayed on the Workspace and in the Data Preview window (Optional),
- Columns - a list of all columns in the input data structure; each column is represented by:
- the
 (A) - the icon used to change the
position of the newly added column (only for added columns),
 - the Column name (B) - the name of the column (editable for newly added columns),
- the Type (C) - the type of data stored (editable for newly added columns),
- the Value (D) - the value to insert into all the rows of the newly added column (only for added columns),
- the
 (E) - delete the added column (only for added columns).
- the
You can click the + Add column (circled red) button a new column in the specified spot. If you want to change
the position of the new column, use the ![]() icon to change the position
of the column.
icon to change the position
of the column.
Aggregation #
This Transformation allows you to split data into groups, apply an aggregation function to each grouped column and combine the results into a new data structure. This transformation allows to compute a summary statistics for each group like sums, counts or means. The resulting data structure will have only the selected columns with grouped values (dropped duplicates) and new columns representing each aggregation applied to all the grouped columns.
If you select only grouped columns then you will receive a new data structure with only the grouped columns. If you select only aggregations then you will receive a data structure with added columns with the same values as the columns that were to be aggregated. Remember to always provide a list of grouped columns and at least one aggregation!
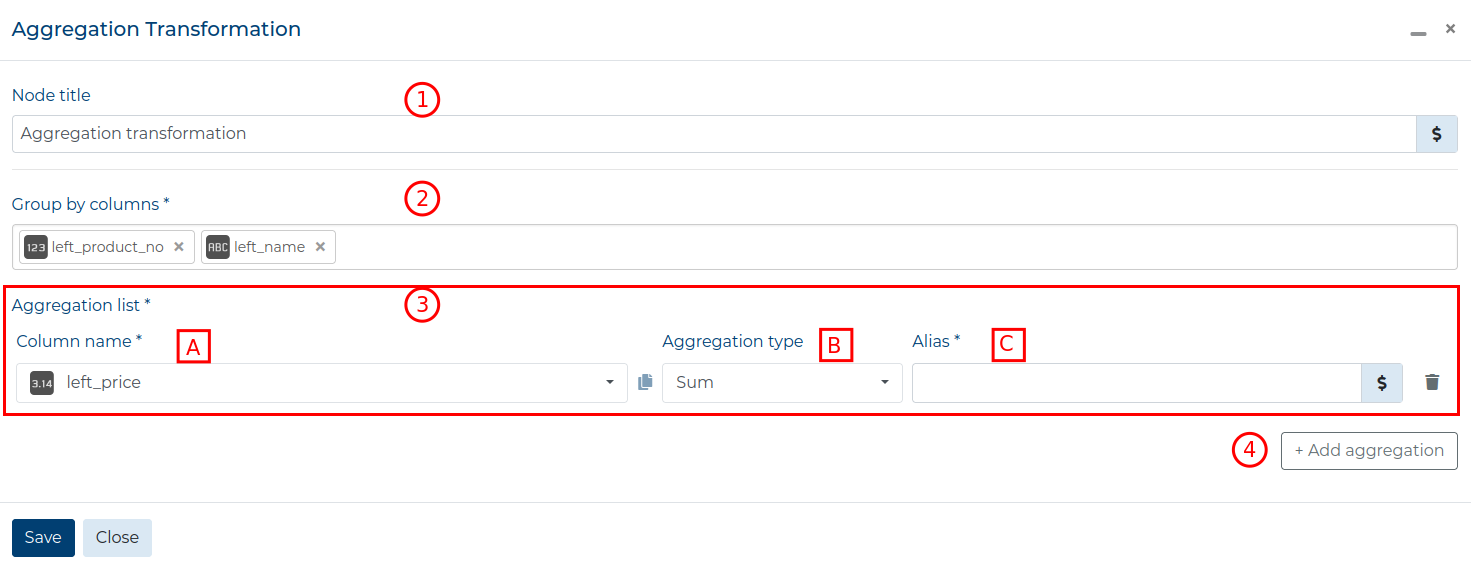
In the configuration window for the Aggregation Transformation, you need to fill out the following fields:
- Node title - the title of this Node that will be displayed on the Workspace and in the Data Preview window (Optional),
- Group by columns - a list of columns to group; choose from the list of all input columns,
- Aggregation list - a list of all the aggregations that will be applied. Each
aggregation consists of:
- the Column name (A) - the column that should have the aggregation applied to,
- the Aggregation type (B) - the type of aggregation to apply on the chosen column,
- the Alias (C) - the name of the newly created column (Must be unique!)
You can click the + Add aggregation button (4) to add additional aggregations.
EXAMPLE RESULT DATA STRUCTURES
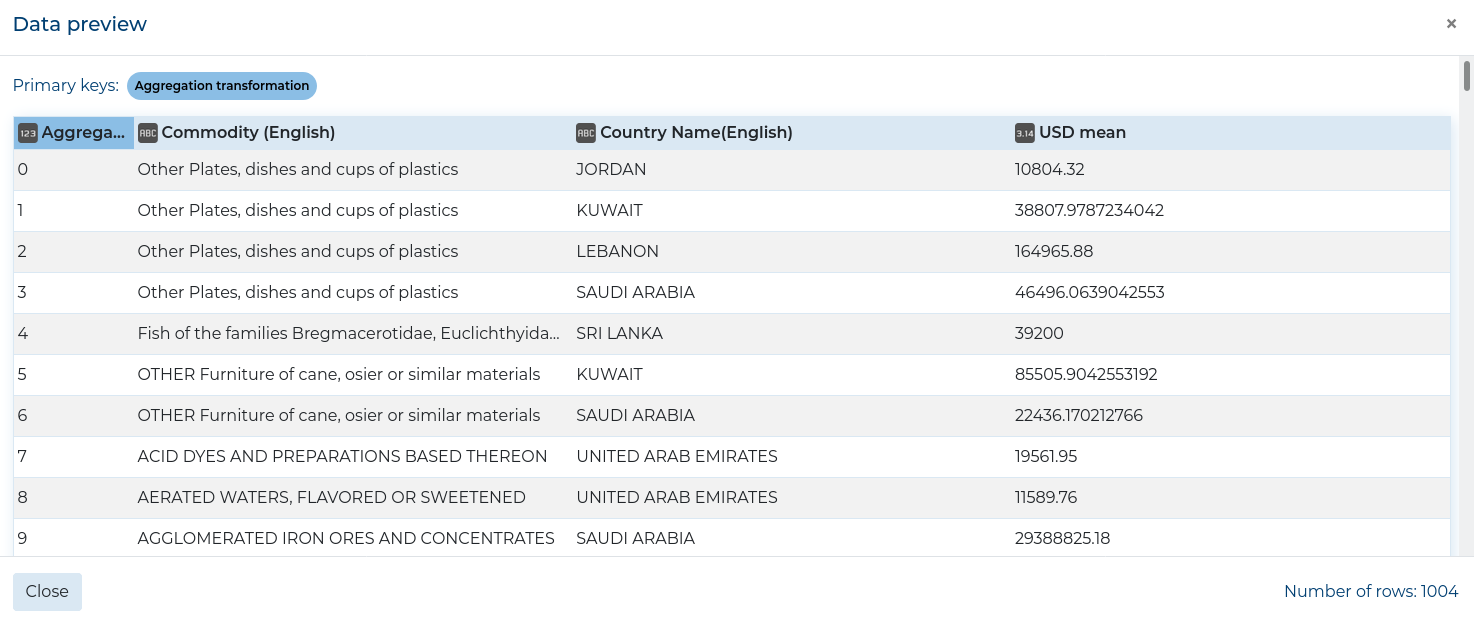
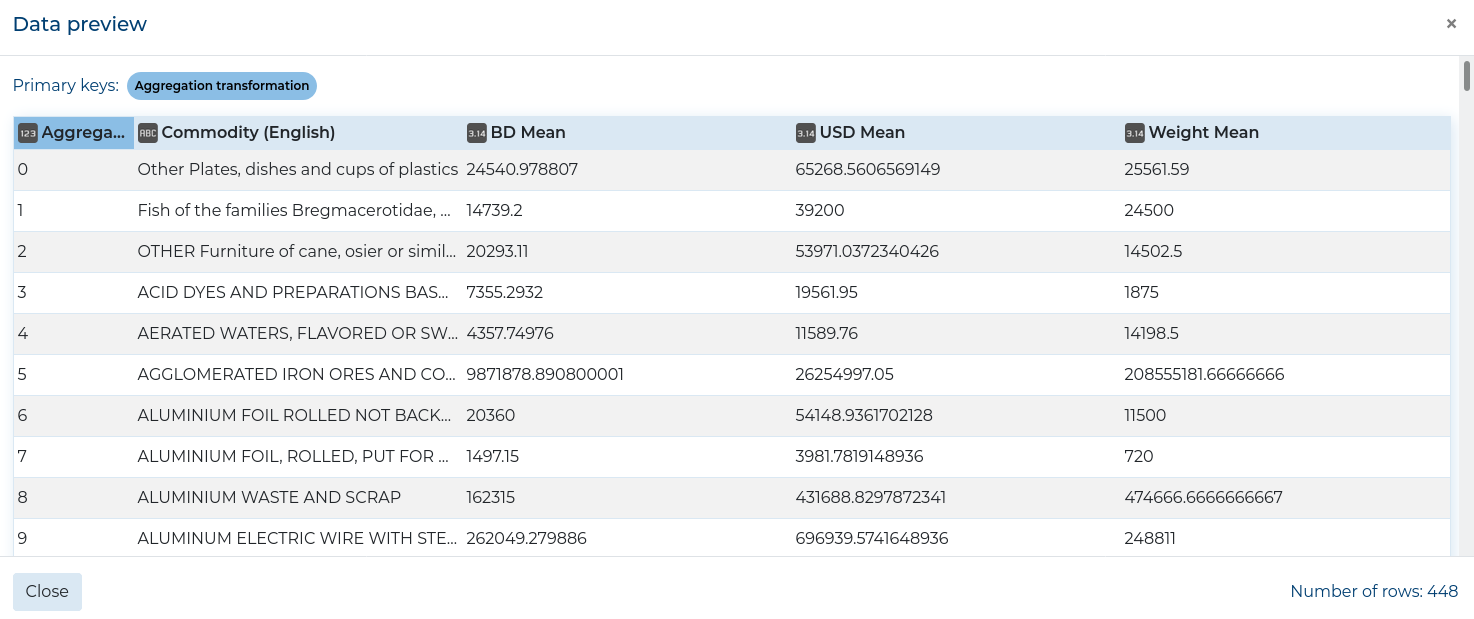
Go to the Aggregation methods section to see the list of methods that you can use.
Sort #
This Transformation allows you to sort the whole dataset by specified columns in the
chosen order. The sorting can be ASCENDING or DESCENDING and is executed from first
to last sort.
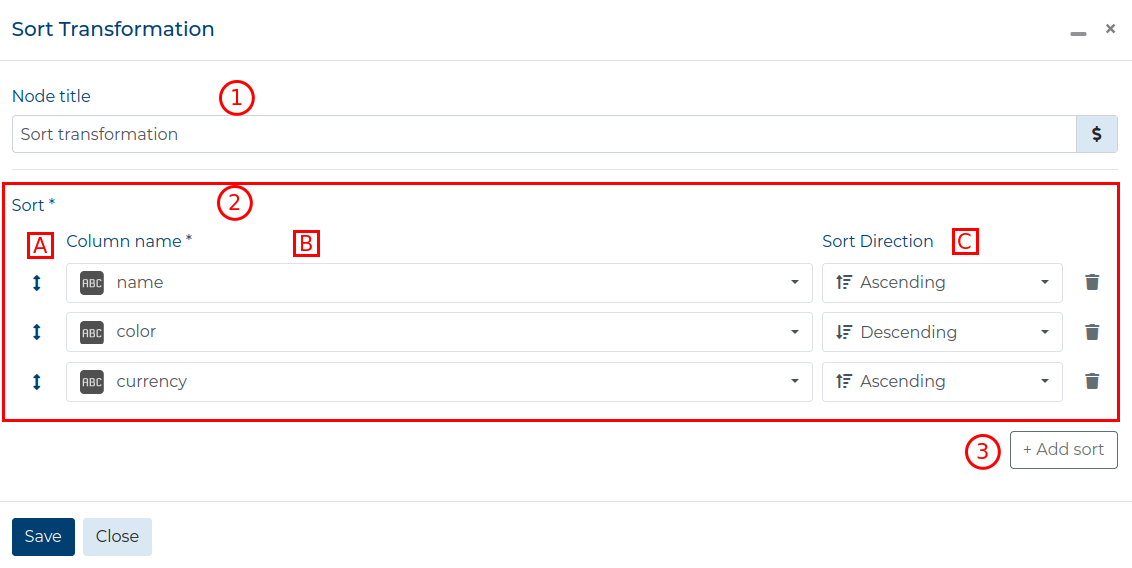
In the configuration window for the Sort Transformation, you need to fill out the following fields:
- Node title - the title of this Node that will be displayed on the Workspace and in the Data Preview window (Optional),
- Sort - a list of all sorts that will be applied. Each sort consists of:
- the
 (A) - the icon used to change the
order of the sorts; the sorts will be applied from top to bottom,
 - the Column name (B) - the column by which the values should be sorted; choose from the columns of the input Node,
- the Sort Direction (C) - which direction to sort the values (
ASCENDINGorDESCENDING),
- the
You can click the + Add sort button (3) to add additional sorts. If all the columns from the input Node are used for sorting, this button is disabled.
